How to: set up Lead Generation Twitter Cards

Lead generation cards are free to use and set up.
This is how you do it.

Lead Gen Twitter Cards of WIN

Regular readers of this website will know that every Friday I put up a collection of the five most interesting things I’ve seen that week.

The posts, imaginatively entitled ‘Five things on Friday‘, are relatively popular. So much so that recently I decided I’d turn them into a weekly newsletter, so that a) folk can get the good stuff delivered to their inbox and b) I could learn how to do it.

And how am I going to get subscribers for this newsletter? From the lead-gen Twitter card!

What is a Lead Generation Twitter Card? Twitter itself expresses the definition thus:

Twitter Cards let you bring rich experiences and useful tools to users within an expanded Tweet. The Lead Generation Card makes it easy for users to express interest in what your brand offers. Users can easily and securely share their email address with a business without leaving Twitter or having to fill out a cumbersome form.

And they look a little bit like this

Lead Generation Twitter Card Example

Fancy, right? It’s a one-click sign up. EASY.

What I’m going to walk you through today is how to set up not only how to set up lead-gen Twitter cards but also linking them to a Mailchimp mailing list and WordPress blog feed.

I’m good to you.

STEP ONE:
SETTING UP THE TWITTER CARD

First, go to Twitter. Well, not strictly speaking. You need to go to ads.twitter.com.

Screen Shot 2014-06-05 at 12.16.41

EDIT: THIS HAS NOW CHANGED

Before you can see the screen below, you will need to enter your credit card details. Twitter will no longer let you create Lead Gen cards (or Website Cards for that matter) without your credit card details.

I’ve entered mine and have steered VERY CLEAR of hitting the ‘promote’ button.

Without entering these details you will not be able to see the buttons demonstrated from this point onwards.

FYI.

Cards_-_Twitter_Ads

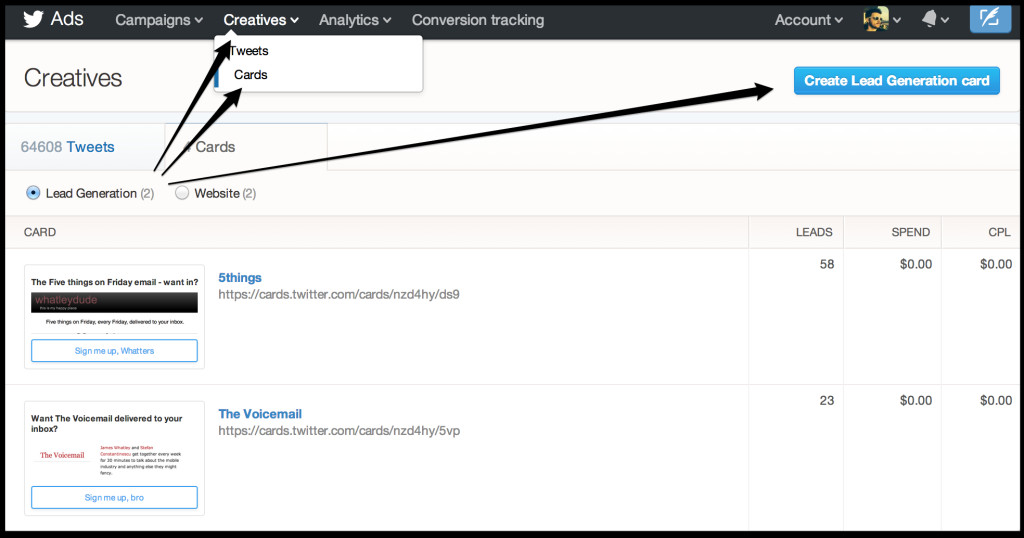
Sign in with your Twitter account (you don’t need to be an advertiser to do this), click on ‘Creatives’ in the top nav, and then ‘Cards’, hit the big blue Create Lead Generation Card button on the right and you’re away.

Most of this first part is pretty simple: you need a description, an image (650 x 150) and a privacy policy. This last part is a little ridiculous, but I’ve created a special page that says I’m not going to sell your email address etc. But there’s no policing around this, so feel free to put a big ‘F U’ in there instead and see if anyone actually calls you on it.

Finish that bit and you’re pretty much ready to go with your first Lead Gen Twitter Card.

Hurrah and hurrah again.

BUT!

You probably want to do a bit more once you’ve got those lovely email addresses. If, like me, you [want to] run your mailing lists through Mailchimp, then this is what you need to do next.

If you scroll down a bit on your lead-gen card page, you’ll see a ‘Data settings (optional)’ section. This is where you add in your Mailchimp id details.

STEP TWO:
SETTING YOUR TWITTER CARD TO TALK TO MAILCHIMP

When you get to Mailchimp (assuming you already have a Mailchimp account), set up a List in Mailchimp. I call mine ‘5 Things’. You might call yours ‘Magic Beans’ or ‘Web Curios’.

Lists___MailChimp

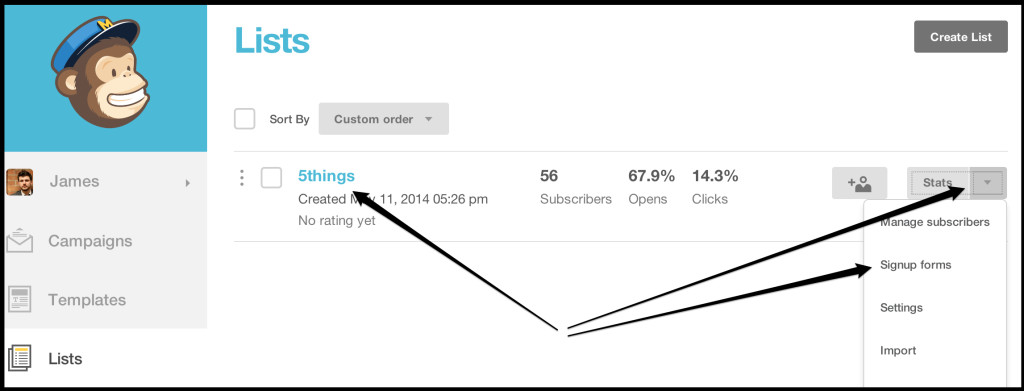
Go to your Lists section, click on the drop down arrow (next to Stats) and head to ‘Sign Up Forms’, then ‘Form Integrations’, and then – oh look, here are the bits you need for your Twitter Card.

And that’s it, you’re done. Anyone that clicks on your Lead-Gen Twitter Card ‘Sign Me Up!’ button will have their email address delivered into your Mailchimp mailing list.

STEP THREE:
SETTING WORDPRESS TO TALK TO MAILCHIMP

WordPress_›_AutoChimp_«_WordPress_Plugins

This part had me going around in circles for a good couple of hours and y’know what? It’s EASY. Go download a plugin called ‘AutoChimp’, boot that up, and pick what tag/category you want to publish (again, for me it’s ‘5things’) and that’s it – you’re done!

It’s not a short process but it’s a relatively simple one.

Some examples –
Test.
The Voicemail.
Mat Morrison.
WWF.

Did you enjoy this post and/or find it useful?

If so, let me know in the comments and maybe consider sharing it with the buttons below.
How to write a trend document

Sharing is caring.

How to write a trend doc

A couple months ago, at work, the new group-level European head of social media challenged me to come up with a couple of ideas that could form part of a trend document for the New Year – ‘We need a trend on one slide, and then maybe a slide on what to do about that trend after – can you do that?’.

Yes, was the answer. Of course. And the end result can be seen on the Social@Ogilvy blog with supporting slides on Slideshare.

But the thing is, whenever I try to come up with new ideas, I always start with words. Yes that’s right, WORDS.  Yes they might end up in a presentation at some point, but I never start with Powerpoint. Ever.

I start with a blank page, a clean browser (eg: no tabs open except search), some questions, and normally one idea that I’ve been noodling to get me going.

The clean page and browser were easy. The questions? They’re as follows:

  • What’s the trend?
    Does it have a name? What’s the angle?
  • What are the key drivers?
    Aim for three. If you have less, think of more. If you have more, reduce.
  • Examples?
    Again, three is the magic number. If there are no examples, then your trend is a prediction [and not wanted here; save it for another document].
  • Implications?
    The inevitable question: what it does this mean for brands?!

Using those four guiding principles, it’s relatively simple. I ended up writing a few for Ogilvy, two made the final cut, and I’ve developed a couple more for publishing elsewhere. But for the benefit of this post, I’ll just show you the first draft document that went onto underpin the aforementioned final presentation.

Copied and pasted direct from Word –

___________________________

TREND: DISPOSABLE CONTENT

DRIVERS

The Content Churn
With content marketing the buzz term of 13/14, every brand (and their corresponding agencies) is on the hook to constantly create content. Continuously churning through idea after idea, meme after meme… The desire to continually satiate the online hunger for more, more, more means that the content created in turn becomes smaller, and quicker to consume.

Unsurprisingly, this inevitably leads to mistakes. Which in turn leads onto our next driver…

Tweet & Delete
With the inevitable errors that happen in 24hr news rooms content hubs, the chances of a piece of work slipping out of the door without the correct sign off increase. It happens in all parts of the marketing industry, this isn’t new to social media.

However, unlike an offensive print ad, or a sexist TV commercial, social channels allow media owners to reach into the past and delete the offending content – as if it had never existed in the first place. This, of course, comes with as many risks and it does rewards. The latter in that it can be missed by many; and for the former? Post-deletion infamy on the Buzzfeeds and Reddits of this world.

Speaking of infamy…

Teens’ ever reducing content legacy
With the advent and subsequent global penetration of social media, the professional adults of today are finding that the penchant for over-sharing that was so new and exciting is slowly coming back to haunt them. Well, we’ve got news for you on this: the kids are wise to this one. The generation growing up RIGHT NOW is unlike no other before. This is the generation that has never known a world without the Internet (can you even imagine that now?) and they don’t want the selfies of today messing up the job interviews of tomorrow.

EXAMPLES

Snapchat [Platform Example]
It’s an obvious choice but it simply cannot be ignored. Given the voracity at which teenagers have embraced the platform and its mission-impossible-esque way of dealing with messaging, it’s no wonder brands are also getting in on the act.

Brand Example 1: 16 Handles was first with its voucher offer.
I like this.

Brand Example 2: Taco Bell + Snapchat collaboration = Burritos.
First(?) example of ‘mass broadcast’ from B2C.

Brand Example 3: Doritos for Halloween
UK example, unsure of purpose/ROI – but interesting as it mentions additional support from other social channels.

Brand Example 4: Charmin / Thor 2
One more than needed, but want to keep it as it fits with/proves ‘Tweet & Delete’.
Plus: it’s brilliant.

IMPLICATIONS

The marketing strategy goes by many names. From agile to reactive, from responsive to real-time – but the preparation and commitment required to make throwaway content such a success remains the same.

Preparation, preparation, preparation
Chance favours the prepared mind, and to get that viral smash, you need to have the approval processes sorted, the brand guidelines locked, and the right people in place to execute. Speaking of which…

Want an A game? Recruit the A team
Too many times do we see headlines that ostensibly blame young talent for social media errors – ‘The intern did it!’ or the like. The mistake here isn’t with the monkey, but in fact with the organ grinder. You need damn good talent to make great content that’s worth missing; so put your best men and women on the job. When it comes to the ephemeral, it’s time to get incredible

Be quick, be nimble, be agile
There’s no point in having the right processes and the right people if you simply don’t have the prowess to get it done promptly. Speed is of the essence.

REMEMBER: Your content is one thumb swipe away from being wallpaper. The trick is making that wallpaper stick.

APPENDIX

Unfinished ideas and other sources/thought starters

Guardian piece on messenger apps vs Facebook
TechCrunch on THE WHY of ephemeral media

Defining ephemeral media-
Amazing ideas from friends – which led to this
Good stuff from Amelia too (she should write more)

___________________________

And that’s about it.

Some structure, some research, and some words.

Do that a few times over, employ a couple of trusted friends to do the proof reading, and et voila: one trend document (here’s another example from 2012). If you’re really lucky, someone might even turn it into a presentation for you.

——–
Oh, and this is by no means the definitive way to write these things, it’s just how I do it.
I hope its useful. 

How to opt-out of auto-play videos in Facebook

If you hadn’t heard, Auto-play ads videos in the Facebook mobile app (and desktop) are on their way.

Facebook Videos - DEATH

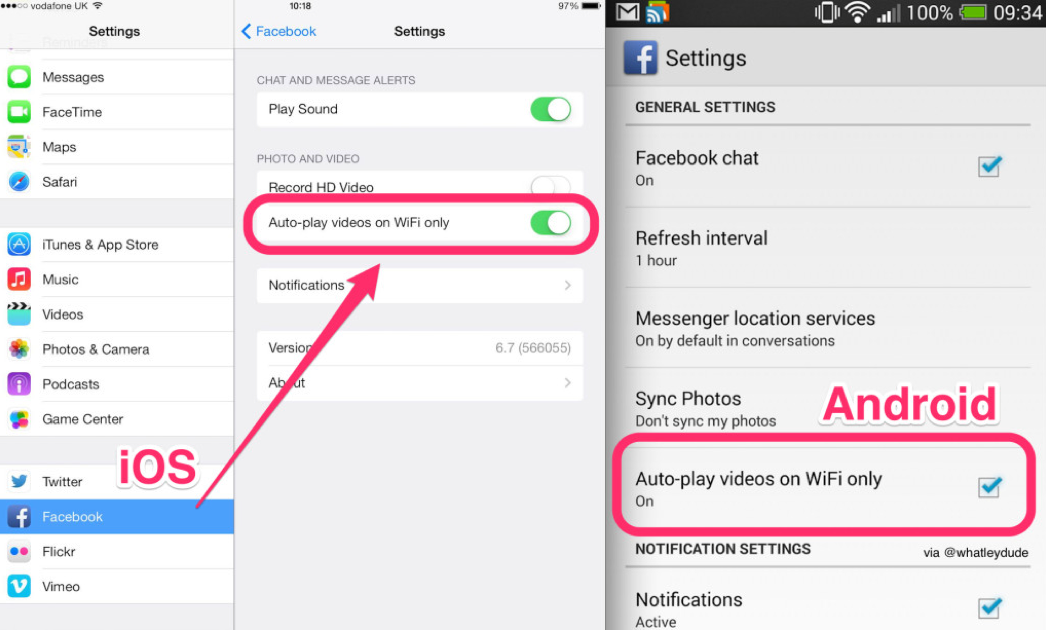
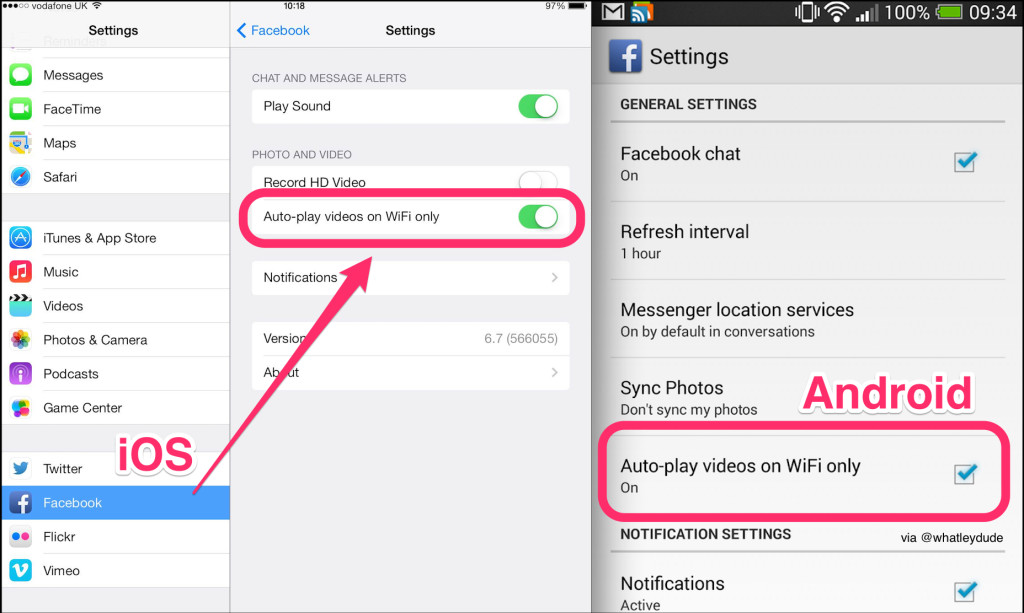
Good? Bad? Annoying? All three? Yeah, maybe. But look, here’s the bad news: on mobile, you can’t actually switch them off. What you can do however is prevent them from playing over your mobile network. In other words, make the videos only download over Wi-Fi only, and ostensibly opt-out of letting them auto-play on your handset.

Here’s how that works.

  • On iOS
    Go to Settings -> Facebook -> Facebook Settings -> ‘Auto-Play videos on WiFi only’
  • On Android
    Go to Facebook -> swipe right to the options pane -> App Settings -> ‘Auto-play videos on WiFi only’

Switch off auto-play videos in Facebook mobile

The benefits of this are two fold:

  1. If you’re hardly ever connected to wi-fi, you can pretty much ‘opt out’ of this auto-play media completely.
  2. If you’re not on any kind of unlimited data plan with your network provider, this will prevent Facebook eating into that precious data.


Hat tip to he who spotted this, Charles Arthur.
Go give him a follow.


Fixing your Flickr photostream

Watching the Watchmen with @pakysse #g20voice

If, like me, you’re a Flickr photo nazi, then you’re probably one of those people who goes nuts when images or videos aren’t tagged correctly or you get minor headaches when certain uploads aren’t placed in the right sets etc. Right?

One bugbear of mine (that I’ve recently solved the problem of), is that of my photos being out of order within my Flickr photostream.

Simply put; Flickr keeps users’ streams in order of DATE UPLOADED not DATE TAKEN. This can be annoying at best and at worse, quite possibly the most frustrating thing in THE ENTIRE WORLD.

To put this into context, a couple of weeks ago my girlfriend and I went to the rather awesome Big Chill festival. We took a multitude of imaging equipment (admittedly, mainly phones), and between us we must’ve shot about 2-300 photos.

If, when we got back home, we uploaded these to the same account one after the other, then that is exactly how they would appear. One set, after the other. But what if I don’t want them like that? What if I want them ALL in chronological order?!

Question – “How do you change the chronology of your Flickr photostream?”

Answer – You use h4ppier photos

With this handy app you can go back and change ALL of your photos date by using one handy little button.

To get to this point, first select ‘Very h4ppy’ at the top of the page, then put in your upload dates and then hit the search button. Once h4ppier photos has found the images it’s looking for, this button (amongst many others) will present itself.

Yes you need to let the app to access your Flickr account. Yes it can be dangerous. But I’m telling you; this is by far and away my favourite 3rd party Flickr app, ever.

Use it. Today.

…..

..

.

At this point I kind of feel obliged to point out that Flickr isn’t all bad. In fact, most of the time, I absolutely LOVE Flickr. When they introduced some new UI changes recently it was quite possibly the coolest… oh wait, hang on – just watch this –

Facing fears

I used to hate PowerPoint.

Hate it. Hate it, hate it, hate it, HATE IT.

For years, I refused to take part. If I had to give a talk or a presentation of any kind, I used my words and speaking abilities only.

“I don’t need slides” I used to say…
(whilst slightly looking down upon everyone else that did)

That was until my employer asked me to travel to Germany to speak at the annual Voicedays event in Wiesbaden. A presentation was required and well, I didn’t have one.

Procrastinate, I did much.

That was up until my then boss casually mentioned in passing that the only reason I hadn’t started my deck yet was because I was afraid of it.

“You’re afraid of PowerPoint.”

“Am not.”

“Then do it then.”

“But…”

“If you’re not afraid of it, do it.”

He was right. I was. My fear? Where to start? What if I get it wrong?
I didn’t know what to do.

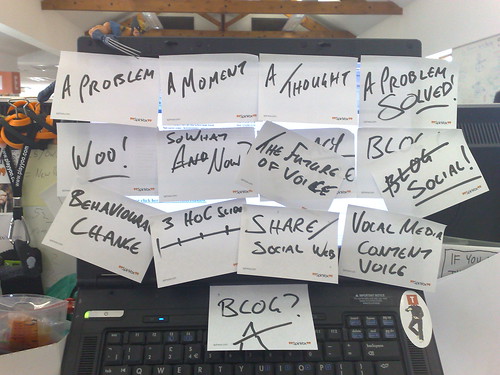
“Tell a story.” he said, “You like post-its, start with your key points on some post-its. See where it takes you.”

I grabbed some nearby post-its, a black marker and – a few mins later – I came up with this…

Genius? No.
The rantings of a serial killer? Maybe.
Cracking my fear of PowerPoint? Definitely.

I’d found my story, the notes were to be my kickers and this below, was the presentation I eventually gave to a room full of delegates at Voicedays ’08:

.

That’s how I cracked my fear of PowerPoint; by telling a story using post-its. They became my kickers. I knew what story I wanted to tell and, by using the stickers as great big reminders/cheat sheets, I ensured I didn’t lose my way.

If you’re struggling with a deck yourself, get offline and start playing with paper & pens and just see where it takes you. You never know, you might start here and end up here.

Good hunting.

Chocolate Chilli: The Video

Following on from yesterday’s Chocolate Chilli post, I thought I’d share this video that I created using images that I took with my Nokia N82 (set to ‘sequence mode’).

So this is me making chilli and blogging the recipe at the same time.

Enjoy!


And if you’re wondering what the hell ‘sequence mode’ is, don’t worry,
I’ve blogged that too 🙂

Doing things in ‘sequence’ – the hidden Nokia feature

Have a great Easter folks!

MIR: How-to: N95 + ShoZu + Geotags + Flickr + GeoRSS + Google Maps = Mash Up Central!

This week Whatley is going all Web 2.0 on your ass. It’s all very well having these magnificent tools at our disposal — but how do you actually get them working? I’ve always liked the concept of geotagging my images — but haven’t quite got round to working out how to do it. It’s actually refreshingly simple. Here’s James with the overview:

– – –

There’s been a lot of buzz online lately about Nokia Beta Labs‘ latest software release – the Nokia Location Tagger.

A quick overview from Nokia:

‘With Nokia Location Tagger, you can automatically tag your location data to your pictures. As you take a picture, your GPS coordinates are saved to the EXIF header of the JPEG file. You can use this data later, for example, to locate your pictures on a map.

That’s a great feature – Fantastic!
(more on the application of this functionality later)

Nokia also go on to say:

‘In the near future, we hope to make location tagging a seamlessly integrated part of your Nokia experience. Until then, Nokia Location Tagger is a small standalone application that gives you a sneak preview. We are not planning to productize this application as such, but we’d love to hear your thoughts already now, so that we have time to take it into account in the mainstream development.

EVEN BETTER!

However, I will not be using this application. I have absolutely no need for it whatsoever. Installing the Nokia Location Tagger onto my handset would be a complete and utter waste of time.

Why? Well, since downloading and installing Share Online 3.0 (another Nokia Beta Labs product) the Web Upload part of my N95 has been rendered useless. I’m told this is probably something to with http protocols on Vodafone; an early Jaiku beta release had similar problems. However the difference is I could uninstall Jaiku. This is not the case with Share Online 3.0. Grr…

So how do I upload media from my N95? Answer: ShoZu.

Yes it does all the cool things like photo/video uploads to all my sharing sites etc but Ricky covered most of that yesterday.

The ‘other’ cool thing that ShoZu does is… *drum roll please* …Geo Tagging!

That’s right. Exactly the same thing that Nokia’s Location Tagger! ShoZu however announced this feature at LAST YEAR’S 3GSM! …nearly a full year ago.

But I’m not here to moan about Nokia playing catch up AGAIN…

I mean, that thing that the iPhone does when you turn it like *that*?
SO cool.
Wouldn’t it be great if the N95 could do that?! If only it had something like a built-in accelerometer…

No wait.
😉

As I said – I’m not here to moan about that – I’m here to show you what this kinda stuff can DO!

Right then.

First you need a GPS enabled phone – an N95 for example.
Then you need ShoZu, (with the GPS tagging switched to ‘on’).

Once you’ve got those two sorted get yourself a Flickr account and enable the two following options:

1. Import EXIF Location Data – http://flickr.com/account/geo/exif/?from=privacy
2. Import Geotagged Photos – http://flickr.com/account/geo/import

All done? Good. Now take a few photos and upload as you like. Got that far? Excellent.

Now go to your Flickr page – here’s mine http://flickr.com/photos/whatleydude

Scroll to the bottom and you should see some feeds – you want the geoFeed.

Image

Right click on that and then ‘copy link location’.

Once you’ve done that – get off to www.google.com/maps and right click, paste into the search box and ‘search maps’.

You SHOULD end up with something like this:

N95 + ShoZu + Geotags + Flickr + GeoRSS + Google Maps = Mash Up Central!

Give it a go and see what you come up with. I was chuffed to bits when I finally got mine together and working correctly. Hence the desire to impart knowledge I guess. Two quick notes before I sign off. First a big thanks to the my Jaiku buddies who inspired me to put this post together and second to point out another great use of ShoZu.

Enjoy!